Friday, April 30, 2010

Body work painted


Well after alot of sanding it was time to find a place to mask off and paint. So with the intent of making it look like it could have come from the factory in this painted area I did it. It looks really glossy now but I think it will dull down in time.


I started the work of pounding out hubs and bearings. This was not fun or easy. I'll need to go get new seals after catching the edge of one now.

Thursday, April 29, 2010

Install new suspension bushings


Well after a call to Fly'in Miata they sent me the layout of the numbered bushings so I could install those today. They went together rather easy once I had the master plan. Lots of silicone lube and presto they're in.

The Kit has arrived!


Well it seems like a long wait for the kit to get here but it gave me time to work on


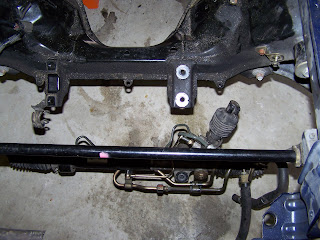
all those little jobs that must get done first anyway. The new subframe is awesome


and I like the boxed frame rather than some other kits use tube frames. Look at the


size of those axles. whoppee!!!!

Body work in engine bay.


Building up the firewall corners with Bonso now and sanding between layers.


It's starting to shape up now.

Tuesday, April 27, 2010


Lots of little stuff to finish

Today it seemed like I just had alot of small projects that need to get done.

I got the trans hump insulated and brought out the drive by wire foot pedal to see how it will layout.

Then I mixed up some fiberglas and went to work on the engine compartment corners to smooth them out and make it ready to through bolt the gas pedal. Then I noticed I still had 4 bushings that hadn't been pressed out yet and they requred me to move the press forward so I could get at them.

Then after the fiberglas hardened I started to put some bondo on the glass to fill it in. OH, and some grinding on the glas before that. Coming together, and the kit is suppose to be delivered tomorrow.

Monday, April 26, 2010

Insulate the interior


I found a great product that is working great to insulate the interior of the Miata. Here is a picture of the product and I found it at Lowes. home Depot had nothing even close. It comes in 3 different widths and I got the 24" one. I think it was about 30 bucks. It looks like it will easily kdo the whole car. I used A/C aluminium tape to seal it and that works fine. Got all but the drivers side done today and I still have to mount the drive by wire foot pedal so I'll wait to finish that. It should really kill some noise as I did the tank area behind the seats also.

Friday, April 23, 2010

Parts painted up today


Well after the removal of the old bushings I thought I'd take the rest of the rear suspension apart.


I scrubbed down the old parts and painted the suspension pieces that will go back into the car. The rear rotors got painted and will go back on and the new front racing rotors are here and do they look nice.

Thursday, April 22, 2010

Suspension and subframe down


Today was good as I got the right side suspension off and then dropped the engine subframe. It was alot easier once all the front end parts were out of the way.


I bought a little shop press and it was adaquate to press the bushings out of the suspension frames. I'll need to get a few tie rod ends as some were torn using the tie rod fork to drop them. New ones would be a good idea as the car is almost 10 years old now anyway.

Wednesday, April 21, 2010

Front suspension dropped


Well today I got the news that my kit was being shipped this week. I went to work on dropping the front suspension down so I can get to the subframe soon. It looks like getting the bushing out is not going to be all that easy. A press sure would be nice but I don't know who has one. One step at a time.

Tuesday, April 20, 2010

Differential out and fuel lines in.


Well today was the day to drop the differential out and it went smoothly. The trans shop said yesterday that the new rear is on the table, so it should be done soon.


After the rear I spent some time trying to snake the stainless fuel line down from the tank to the fuel regulator and after a few tries I found a path to gfet there. If I can't get the fittings to complete the hard line it looks like I have enough line to run stainless all the way.

Monday, April 19, 2010

Weekend off


Had a charity golf tournament this weekend and went to the beach at New Smyrna. My brother and wife came and it was a great time. Now back to work on the Miata. I got the right side of the rear apart today and I having a hangup with matching fuel line fittings. Hope to solve that soon. I'm still waiting for the kit manufacturer to send the parts as its been almost two weeks.

Picture is of my friend john's 5.0L Miata.

Thursday, April 15, 2010


I decided today before ordering the new radiator (the Miata radiator is really small) to mount the A/C condenser up as close to the front as it will go. I tried a couple of mounts and found that if I sliced the brackets and bent them forward I could mount them on the angle supports in the front nose. I drilled and tapped each side and cut some of the plastic on the bottum and she fit really well.

Tuesday, April 13, 2010


Today was a good day as I had earlier got the spindle nut torched off. Then I was able to pull the rest of the rear assembly apart and srop ou the hub that will need to be rebroached when the parts come. Oh, I sent and e-mail to the company and asked if it had been shipped and got a reply that no it hasn't. There shop forman had knee surgery and they are swamped with orders he reported. Well that just makes me focus on all the other projects that need to be done first anyway.


Oh, "Thank you Jesus" and man called and wanted to buy my old engine that I put on Craigslist a weekor so ago and he came and it's gone whooppee!


I dropped the steering rack down today also as it needs to be relocated on the new subframe when it is shipped,

Fuel line layout


The stock fuel line in the Miata is to small for the bigger LS V8 so from the pump to the engine all the lines had to be replaced. I've order the stainless flex fuel line from Summit Racing and will be using a hard line from the filter/regulator (99 Vette) to the engine bay, where it goes back to flexline again.

Axle spindles


The first thing on the instructions from my company (Boss Frog) was to crack the wheel nuts and the spindle nut before putting the car up on jacks. Well do you think I highlighted that important fact? NO! I did all the rest but not number one. OUCH!!! The first axle spindle was not a big problem but the second had me going for days as how I could break it loose. I tried several things and didn't budge it. Then it came to me that I didn't need to worry about the axle itself as that is getting replaced so I could torch it off. Yeah, it work at last.

Sunday, April 11, 2010


Here it is with the back corners cut away.


With the engine out it was time to do the little cutting that is necessary in the back of the engine bay. The two rear corners must be cut back to make room for the LS motor. I was able kto use a sabre saw with a metal blade and work around the brake lines to cut it out.


The fuel system is another challenge as I am working with small lines form the Miata and 3/8 from the LS motor. The fuel pump needs to be larger to create more pressure for the system. The top of the tank is under the rear boot area and it didn't take long to get at it.

I found the 8.8 Ford Posi unit on e-bay and it arrived. It's from a 90 thunderbird Super Coupe so she is old and I will send it out for new bearings and seals etc.

Saturday, April 10, 2010


Well the big day has come to start taking this car apart and how can I thank God enough for having a three car garage to work in. The car just fits with enough room for the lift to pull back and swing the motor out. It was a job just getting this little girl up on the stands for starters. I haven't asked for help yet so I've just made it hard on myself to this point.


At took a couple of days disconnecting things and planning the pull out. These newer cars have so many systems and wiring that it always seems like another one shows up when you think you have them all. But without a second man I was able to get her up and out. My wife wasn't to happy that I did it while she was out and didn't have a safety person standing by. I must say it isn't always the best thing to do.

OK the trans is here!


The trans I bought on E-bay looks good and came with everything. I thought about using the pressure plate and clutch disc as they appear in great shape but if this motor goes over 400HP as I think it will this setup won't be strong enough to hold it very long. I sure don't want to do all this work and have to pull it apart in a little while because I was saving some money. My research said that the LS7 clutch will be the best and least expensive way to go. I will need the flywheel pressure plate and disc so they all match. I was very blessed by a parts man at the local Chevy dealership who is giving me the tradesmans prices without asking for it. He saved me a ton of money with all the stuff I'm getting for this build.

2000 SS Camaro T-56 transmission arrives from e-bay